Current Settings
Initially, we have configured:
- Office 365 accounts/mailboxes already provisioned in Office 365/Exchange Online.
- Users IDs and passwords are setup in Office 365.
- Local Active Directory has all account objects.
- There is AD Connect Server locally Installed which points to an empty OU.
- There is no Exchange Server locally Installed.
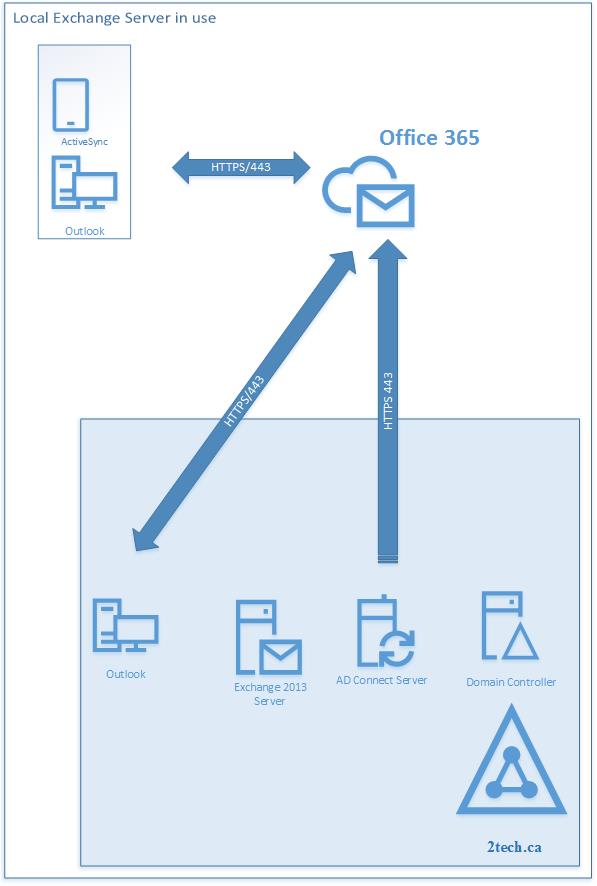
We need to link Office 365 accounts back to On-premises Active Directory accounts.
Password need to be sync from On-premises Active Directory to Office 365.
In this configuration, we are going to install local Exchange Server and use only supported method of syncing and provisioning accounts from local On-premises Active Directory.
We will use local AD account second@9tech.ca to sync to already provisioned user\mailbox in Office 365 with primary SMTP second@9tech.ca.
Install local Exchange server and change The Source of Authority to Local Active Directory
The following steps are necessary to change source authority from Azure AD to local Active Directory with On-premises Exchange Server installed.
- Download your version of Exchange 2016 Server.
- Expand Exchange Schema and install Exchange 2016 server locally On-premises
- After you install Exchange server run the following command to disable local SCP record in AD
Set-ClientAccessServices -Identity server -AutodiscoverServiceInternalUri $null - To be able to provision new office 365 mailbox using EAC on On-premises, we need to run the following commands to configure remote domains to Exchange Online
New-RemoteDomain –Name “9tech1.mail.onmicrosoft.com” -DomainName “9tech1.mail.onmicrosoft.com”
Set-RemoteDomain -Identity “9tech1.mail.onmicrosoft.com” -TargetDeliveryDomain $true -AllowedOOFType InternalLegacy -TNEFEnabled $true - Use the following two commands to export user attributes from Azure AD and from Exchange Online to two csv
Get-MSOLUser | Select DisplayName,UserPrincipalName,City,Country,Department,Fax,FirstName,LastName,MobilePhone,Office,PhoneNumber,
PostalCode,@{Name=’ProxyAddresses’;Expression={[string]::join(“;”,($_.ProxyAddresses))}},State,StreetAddress,Title |
export-csv c:\reports\MSOL-Users.csv -NoTypeInformation - If there are more attributes in use, we will need to expand upper command to include additional attributes. The link with additional attributes can be found here
https://docs.microsoft.com/en-us/azure/active-directory/hybrid/reference-connect-sync-attributes-synchronized
Get-Mailbox | Select DisplayName,UserPrincipalName,@{Name=“EmailAddresses”;Expression={$_.EmailAddresses |
Where-Object {$_ -LIKE “SMTP:*” }}},EmailAddressPolicyEnabled,PrimarySmtpAddress,WindowsEmailAddress,ForwardingSmtpAddress,ForwardingAddress |
export-csv c:\reports\Exchange-Online-Users.csv -NoTypeInformation - Edit both files to populate blank fields with missing data/attributes (tel number, address etc).
- Run the following command on local On-premises Exchange Server to create a remote mailbox using data from MSOL-Users.csv file.
Enable-RemoteMailbox -Identity “second@9tech.ca” -RemoteRoutingAddress “second@9tech1.mail.onmicrosoft.com” -PrimarySmtpAddress second@9tech.ca - Run the following command on local On-premises Exchange Server to assign an additional email address to previously created Remote Mailbox using data from MSOL-Users.csv file.
Set-RemoteMailbox -Identity “second@9tech.ca” -EmailAddressPolicyEnabled $false -EmailAddresses smtp:secondd@9tech.ca,SMTP:second@9tech.ca,smtp:seconddd@9tech.ca - Run the following command on local On-premises Exchange Server to assign additional attributes to the local AD account using data from Exchange-Online-Users.csv file.
Set-User -Identity “second@9tech.ca” -DisplayName “Second Test” -UserPrincipalName “second@9tech.ca” -City “Atlanta” -Country “United States” -Department “Information Services” -Fax “” -FirstName “Second” -LastName “Test” -MobilePhone “” -Office “Midtown” -Phone “+1 (404) 326-0000” -PostalCode “30000” -State “GA” -StreetAddress “1100 Baif Street, Suite 1000” -Title “Senior Helpdesk Support Technician - Move mailbox to OU which is in AD Connect sync scope.
- Notify users that Office 365 password is going to change and that new password is going to be same as internal AD password
- Perform AD Connect Sync
- Check if user’s status was changed from “In Cloud” to “Synced with Active Directory”.
- Check if user can login to Exchange Online using internal Active Directory password
- After those steps, all attributes for the specified users are copied from Office 365 back to On-premises Active Directory, a password is uploaded from Local Active Directory and all attributes of the mailbox are managed locally from Exchange Server.
Hi Dan,
Great article!
Did you mean to say in “Current Settings”
Initially, we have configured:
Office 365 accounts/mailboxes already provisioned in Office 365/Exchange Online.
Users IDs and passwords are setup in Office 365.
Local Active Directory has all account objects.
“There is no AD Connect Server locally Installed.” >>>> “There is AD Connect Server locally Installed.”???
There is no Exchange Server locally Installed.
I corrected it. You need AD Connect installed but it has to point to empty OU.
And do you know the updated link for this?
https://msdn.microsoft.com/en-us/library/azure/dn194133(v=azure.98).aspx
The above one is not working.
I corrected a link in the document.
The new link is https://docs.microsoft.com/en-us/azure/active-directory/hybrid/reference-connect-sync-attributes-synchronized