
This article will show you step by step instructions on how to migrate the single physical server to Azure VM.
This is a possible scenario where you can use this step by step instructions.
- Small Business which has a single Small Business Server
- Single Web server sitting in a rack which is hosted with some ISP
- Any other scenario where is difficult to set up second windows 2012 R2 to be configuration server to use Azure Recovery Services Vault
We can also use Azure Recovery Services Vault, but that will require the setup of another configuration server to manage migration which is many cases is impossible.
Here is the requirement for Recovery Services Vault
https://docs.microsoft.com/en-us/azure/site-recovery/physical-azure-architecture
Instead of using Recovery Services Vault we will use free Disk2VHD tool to convert the server to VHD file and use Add-AzureRmVhd PowerShell to upload the file to Azure.
Prerequisites
- Azure Subscription
- Free Disk2VHD tool
- External USB drive
- Access to the Internet from the host system
System Hosted On-premise
- Windows 2008 R2 Server
- Single C drive
- Web Server (example)
This is a diagram of our configuration.
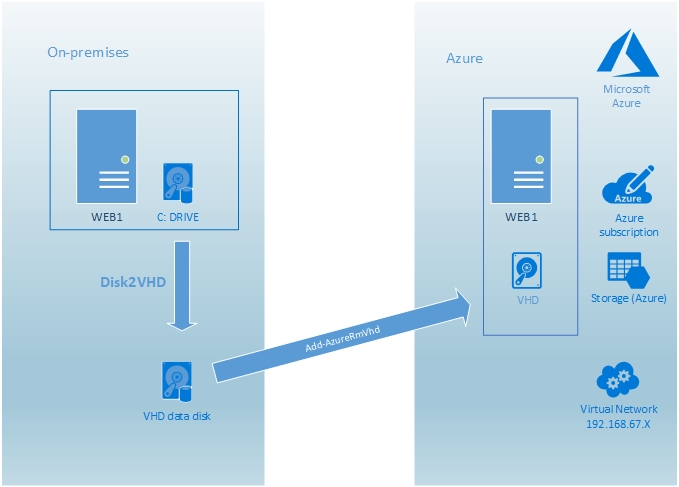
Overview of migration
- Create Virtual Network and Subnet in Azure Portal
- Run the Powershell script to adjust server configuration for AZURE VM. For example, the script will enable RDP access, DHCP services are running and etc.
- Install Azure Agent on an on-premise server
- Install Disk2VHD tool to convert physical C drive to VHD drive on On-premise
- Install the PowerShell Module for Azure on-premise
- Run Disk2VHD tool and convert C drive to VHD file on an on-premise server
- Upload VHD drive to Azure using Add-AzureRmVhd commands
- Create VM using uploaded VHD drive
- Start Azure VM
- Switch DNS records to point to Azure IP address.
- Decommission on-premises Server
Disk2vhd Tool
Disk2vhd is a utility that creates VHD (Virtual Hard Disk) versions of physical disks.
We can run Disk2vhd on a system that’s online. Disk2vhd uses Volume Shadow Copy Service capability to create point-in-time snapshots of the volumes you want to include in a conversion. We can use Disk2vhd to create the VHDs on local volumes, even ones being converted
Add-AzureRMVhd cmdlet
We are going to use Add-AzureRMVhd cmdlet for uploading VHD file to Azure.
Add-AzureRMVhd will
- Check the file you are uploading and make sure it’s a proper Azure-compatible VHD,
- Calculate an MD5 hash to validate proper file transfer validity.
- Detect empty blocks and doesn’t upload them, saving transfer time
Azure doesn’t support dynamic so the tool will convert your disk to a fixed disk if need to.
If the disk you are uploading is fixed, Azure will check the disk for unused space, and won’t transfer that data.
Create Virtual Network and Subnet in Azure Portal
Login to https://portal.azure.com
We will need to create the following object in Azure
- Resource Group
- Storage Account
- Virtual Network
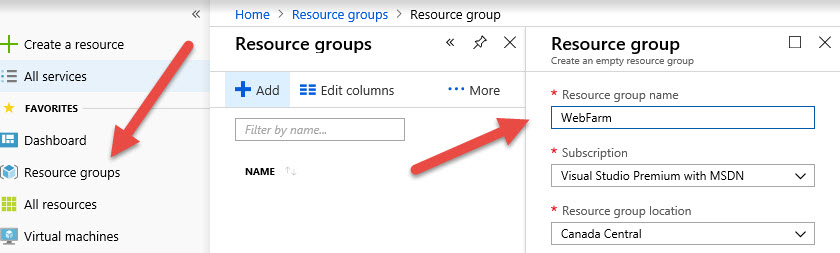
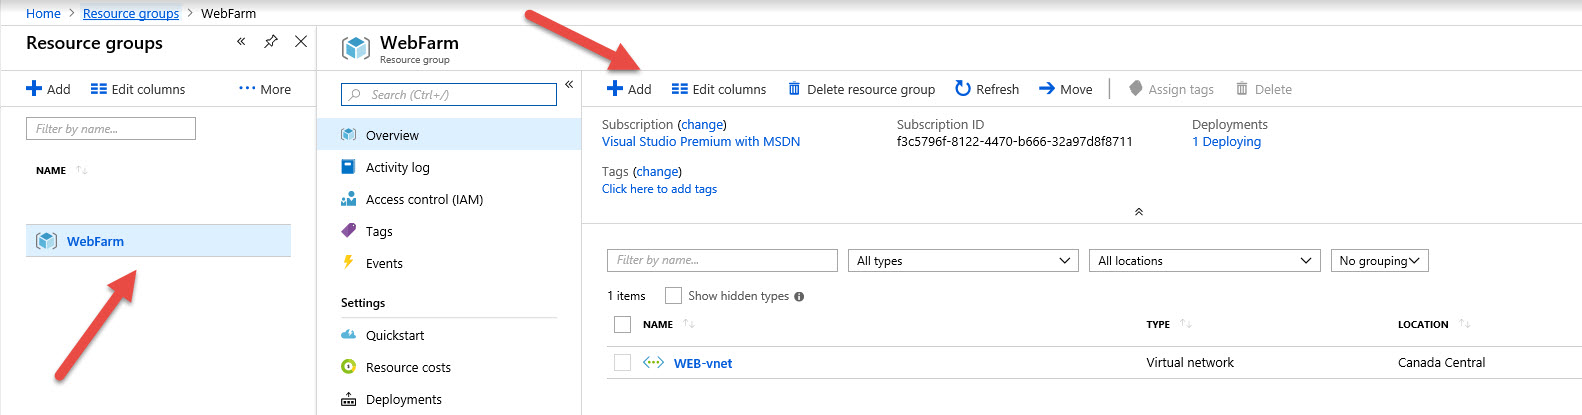
Navigate to Resource Group Container and clicking Add button to add new Resource Group.
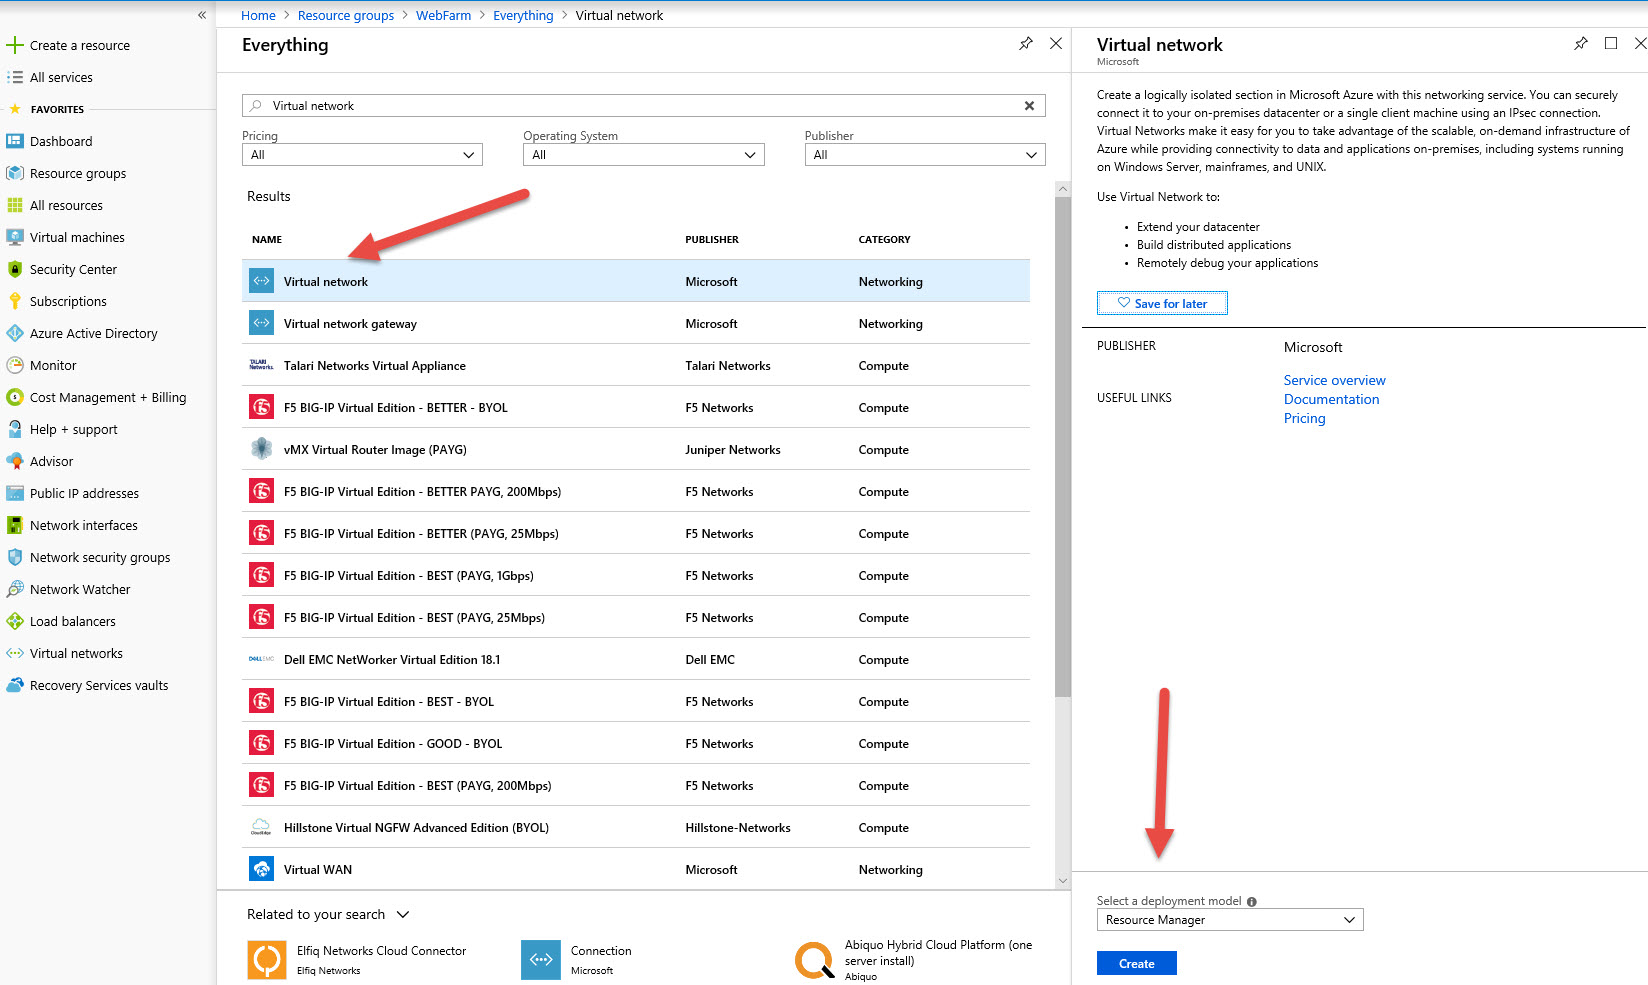
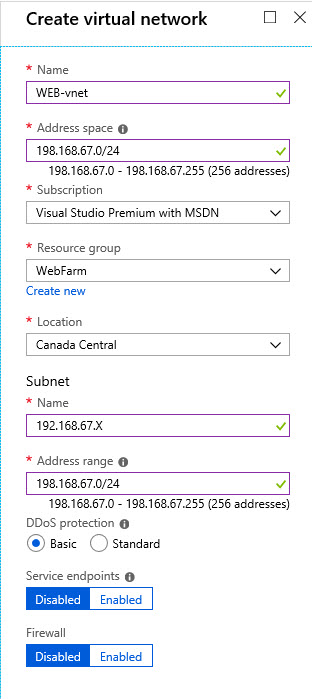
Navigate to newly created Resource Group and add new Virtual Network
You can use the same subnet what are you using on the local network
In our case, Virtual Network and Subnet use the same network.
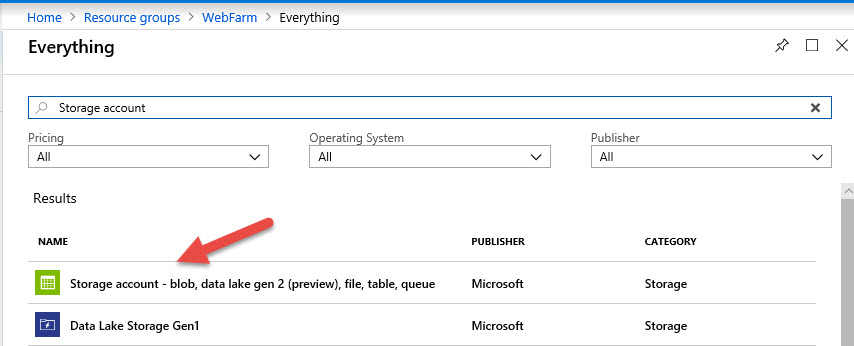
Add new Storage Account
Search for Storage Account and add Storage Account
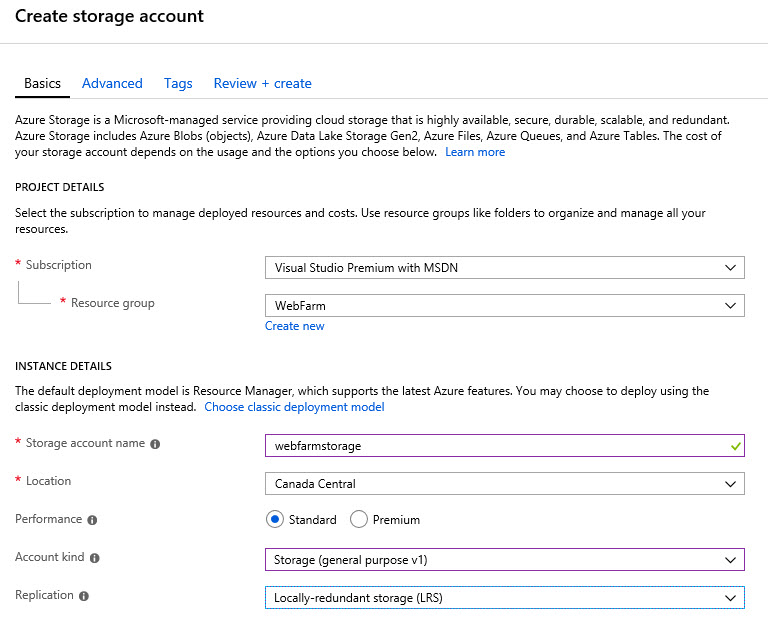
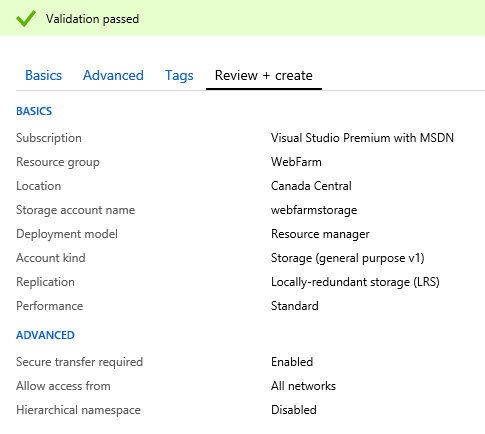
Fill up Storage Account properties
Storage Account has been successfully created.
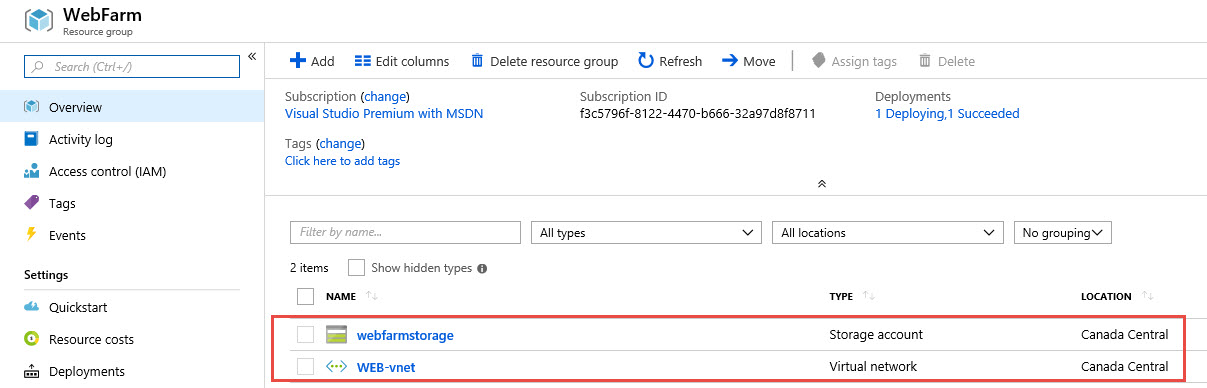
When you navigate to Resource Group, you should have Storage Account and Virtual Network listed.
Prepare On-Premises Server
Install Powershell ISE tool
We are enabling PowerShell ISE toll provided with Windows 2008 R2 Server running two commands in PowerShell.
Import-Module ServerManager
Add-WindowsFeature PowerShell-ISE

Run Powershell ISE from an on-premises server. We recommend using Powershell ISE for the rest of the installation.
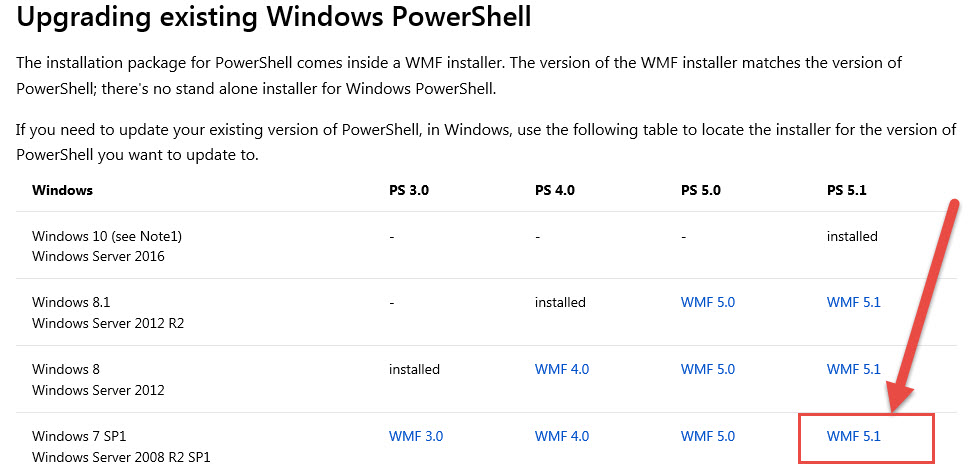
Upgrade Existing PowerShell version
Check PowerShell Version using the following commands
$PSVersionTable.PSVersion
You can download the new version here https://docs.microsoft.com/en-us/powershell/scripting/setup/installing-windows-powershell?view=powershell-6#upgrading-existing-windows-powershell
We recommend to Install a 5.1 version

Install Azure PowerShell on Windows
Run the following command to install Azure PowerShell
Install-Module -Name AzureRM -AllowClobber
Set-ExecutionPolicy unrestricted
Reset some of the settings on an on-premises server
Run the following Powershell commands in Powershell ISE to prepare an on-premises server for Azure VM environment.
This commands will reset some RDP properties and enables same services to prepare a server for Azure VM environment
netsh winhttp reset proxy
diskpart
san policy=onlineall
exit

Set-ItemProperty -Path 'HKLM:\SYSTEM\CurrentControlSet\Control\TimeZoneInformation' -name "RealTimeIsUniversal" 1 -Type DWord

Set-Service -Name w32time -StartupType Auto
powercfg /setactive SCHEME_MIN

Set-Service -Name bfe -StartupType Automatic
Set-Service -Name dhcp -StartupType Automatic
Set-Service -Name dnscache -StartupType Automatic
Set-Service -Name IKEEXT -StartupType Automatic
Set-Service -Name iphlpsvc -StartupType Automatic
Set-Service -Name netlogon -StartupType Manual
Set-Service -Name netman -StartupType Manual
Set-Service -Name nsi -StartupType Automatic
Set-Service -Name termService -StartupType Manual
Set-Service -Name MpsSvc -StartupType Automatic
Set-Service -Name RemoteRegistry -StartupType Automatic

Set-ItemProperty -Path 'HKLM:\SYSTEM\CurrentControlSet\Control\Terminal Server' -name "fDenyTSConnections" -Value 0 -Type DWord
Set-ItemProperty -Path 'HKLM:\SOFTWARE\Policies\Microsoft\Windows NT\Terminal Services' -name "fDenyTSConnections" -Value 0 -Type DWord
Set-ItemProperty -Path 'HKLM:\SYSTEM\CurrentControlSet\Control\Terminal Server\Winstations\RDP-Tcp' -name "PortNumber" 3389 -Type DWord
Set-ItemProperty -Path 'HKLM:\SYSTEM\CurrentControlSet\Control\Terminal Server\Winstations\RDP-Tcp' -name "LanAdapter" 0 -Type DWord
Set-ItemProperty -Path 'HKLM:\SYSTEM\CurrentControlSet\Control\Terminal Server\WinStations\RDP-Tcp' -name "UserAuthentication" 1 -Type DWord
Set-ItemProperty -Path 'HKLM:\SYSTEM\CurrentControlSet\Control\Terminal Server\WinStations\RDP-Tcp' -name "SecurityLayer" 1 -Type DWord
Set-ItemProperty -Path 'HKLM:\SYSTEM\CurrentControlSet\Control\Terminal Server\WinStations\RDP-Tcp' -name "fAllowSecProtocolNegotiation" 1 -Type DWord
Set-ItemProperty -Path 'HKLM:\SOFTWARE\Policies\Microsoft\Windows NT\Terminal Services' -name "KeepAliveEnable" 1 -Type DWord
Set-ItemProperty -Path 'HKLM:\SOFTWARE\Policies\Microsoft\Windows NT\Terminal Services' -name "KeepAliveInterval" 1 -Type DWord
Set-ItemProperty -Path 'HKLM:\SYSTEM\CurrentControlSet\Control\Terminal Server\Winstations\RDP-Tcp' -name "KeepAliveTimeout" 1 -Type DWord
Set-ItemProperty -Path 'HKLM:\SOFTWARE\Policies\Microsoft\Windows NT\Terminal Services' -name "fDisableAutoReconnect" 0 -Type DWord
Set-ItemProperty -Path 'HKLM:\SYSTEM\CurrentControlSet\Control\Terminal Server\Winstations\RDP-Tcp' -name "fInheritReconnectSame" 1 -Type DWord
Set-ItemProperty -Path 'HKLM:\SYSTEM\CurrentControlSet\Control\Terminal Server\Winstations\RDP-Tcp' -name "fReconnectSame" 0 -Type DWord
Set-ItemProperty -Path 'HKLM:\SYSTEM\CurrentControlSet\Control\Terminal Server\Winstations\RDP-Tcp' -name "MaxInstanceCount" 3000 -Type DWord

Remove-ItemProperty -Path 'HKLM:\SYSTEM\CurrentControlSet\Control\Terminal Server\WinStations\RDP-Tcp' -name "SSLCertificateSHA1Hash"

Set-ItemProperty -Path 'HKLM:\SYSTEM\CurrentControlSet\services\SharedAccess\Parameters\FirewallPolicy\DomainProfile' -name "EnableFirewall" -Value 1 -Type DWord
Set-ItemProperty -Path 'HKLM:\SYSTEM\CurrentControlSet\services\SharedAccess\Parameters\FirewallPolicy\PublicProfile' -name "EnableFirewall" -Value 1 -Type DWord
Set-ItemProperty -Path 'HKLM:\SYSTEM\CurrentControlSet\services\SharedAccess\Parameters\FirewallPolicy\Standardprofile' -name "EnableFirewall" -Value 1 -Type DWord

Enable-PSRemoting -force
netsh advfirewall firewall set rule dir=in name="Windows Remote Management (HTTP-In)" new enable=yes
netsh advfirewall firewall set rule dir=in name="Windows Remote Management (HTTP-In)" new enable=yes

netsh advfirewall firewall set rule group="Remote Desktop" new enable=yes
netsh advfirewall firewall set rule dir=in name="File and Printer Sharing (Echo Request - ICMPv4-In)" new enable=yes
Install Azure VM Agent on local On-premises Server
Download and Install Azure VM agent on the local on-premises server
http://go.microsoft.com/fwlink/?LinkID=394789&clcid=0x409
Install Disk2VHD Tool local On-premises Server
Plug local USB drive to a server. Drive has to be bigger than C drive which we are migrating.
Download and unpack Disk2VHD tool on local USB Drive
http://download.sysinternals.com/files/Disk2vhd.zip
Capture Image from Server
After we capture the image, all changes on-premises server will NOT be reflected in the migrated server.
- Run Disk2VHD tool.
- Pick up boot volume and C drive.
- Save VHD file to a USB drive.
- Do not use VHDX
- Use Volume Shadow Copy

Run Create button and image will be captured and save in couple minutes.
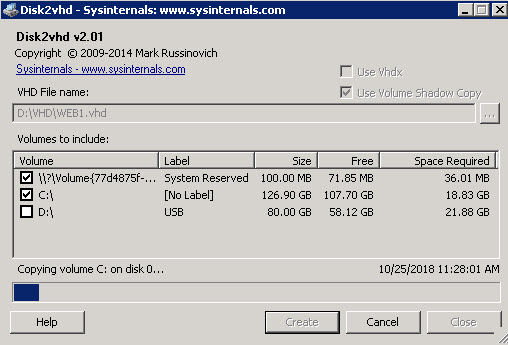
In our case, it took around 10 min for the content of (C drive 20 Gb) to be copied to VHD file on the USB drive.
Upload VHD file to Azure Storage Account
Configure storage account and retrieve Storage URL
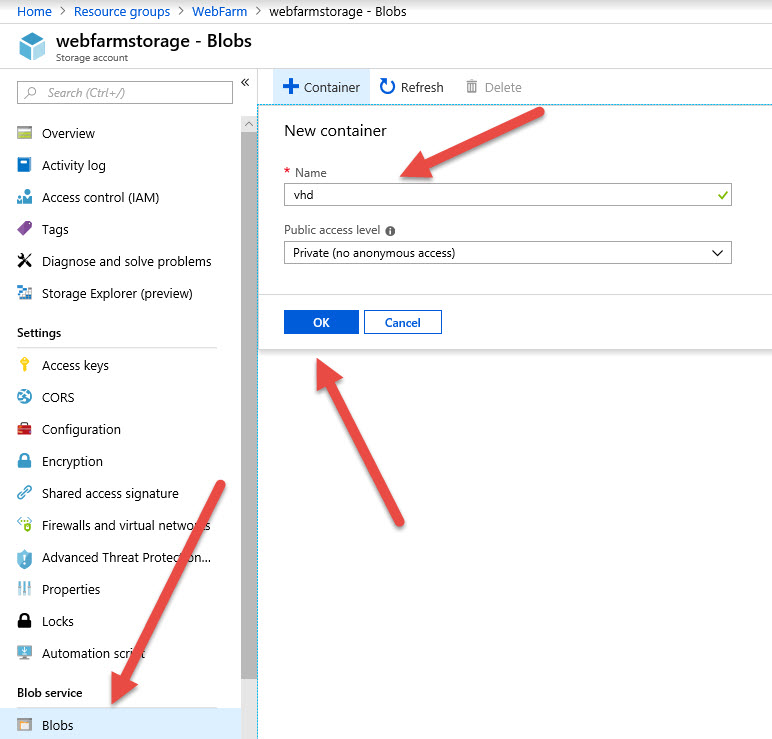
Login back to Azure Portal, navigate to your storage account – Blobs and add a new container. We will call it VHD.
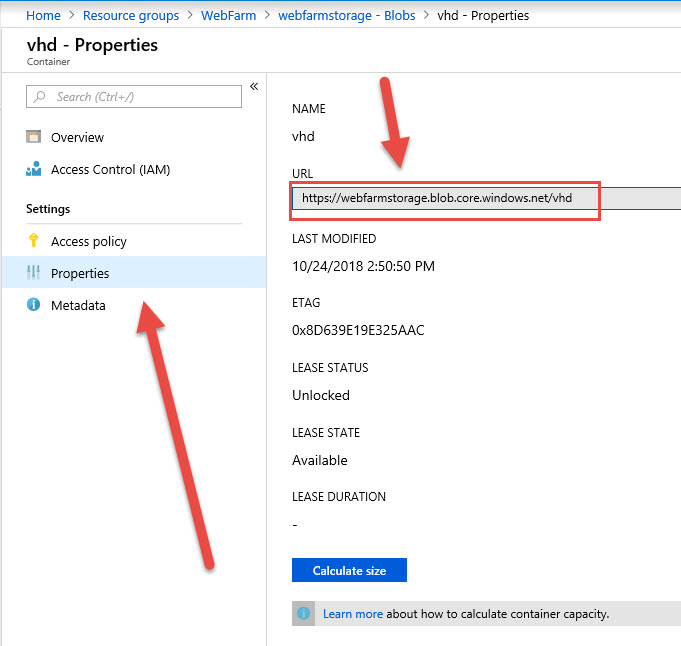
After you created a container, navigate to properties of VHD container and write down URL.
You will need this ($destinationVhd variable) when you start uploading VHD to Azure.
Upload VHD file to Azure and configure VM
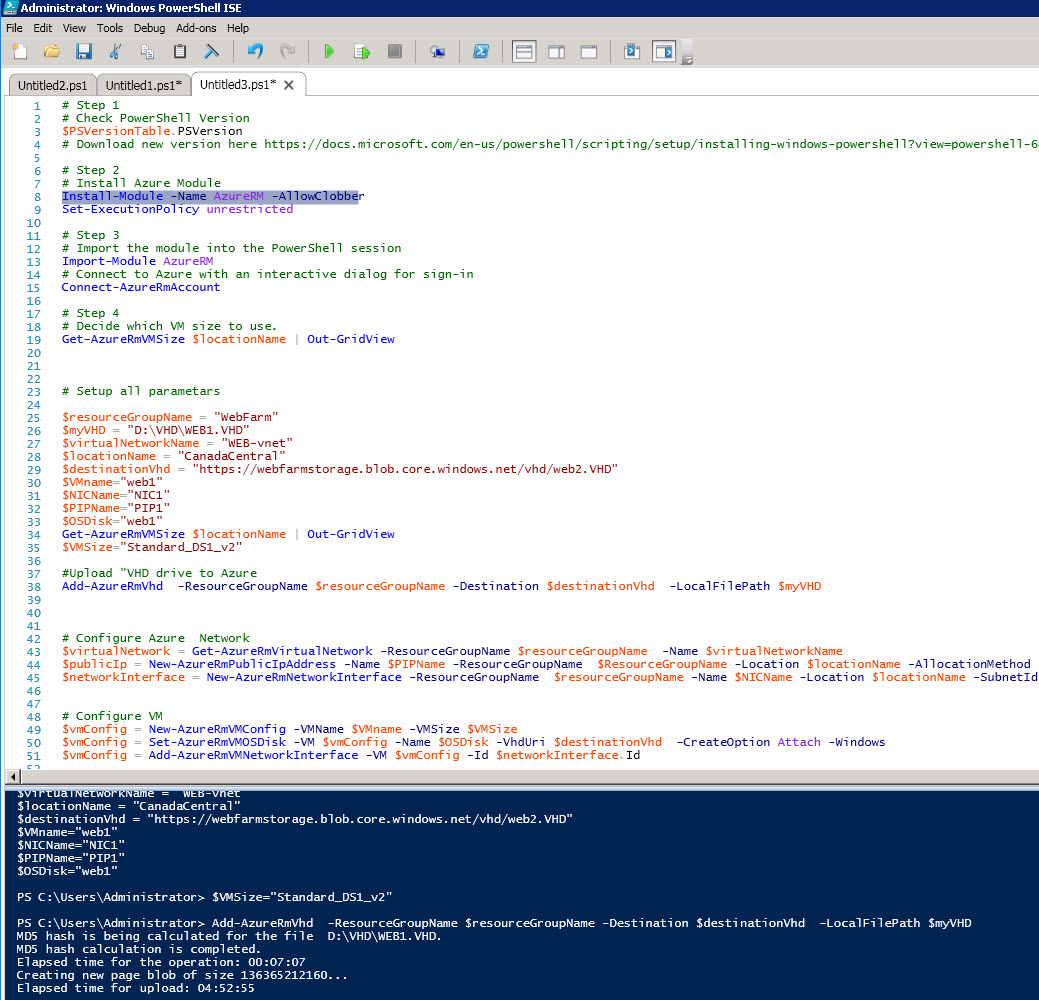
Run the following commands to upload VHD file to Azure Storage Account and configure VM
In our case, It took almost 5 hours to move 22 Gb VHD file to Azure storage. Out maximum upload speed is 10 Mbps and PowerShell is using it all.
Run the following Powershell commands
# Import the module into the PowerShell session
Import-Module AzureRM
# Connect to Azure with an interactive dialogue for sign-in
Connect-AzureRmAccount
# Setup all parametars
$resourceGroupName = “WebFarm”
$myVHD = “D:\VHD\WEB1.VHD”
$virtualNetworkName = “WEB-vnet”
$locationName = “CanadaCentral”
$destinationVhd =”https://webfarmstorage.blob.core.windows.net/vhd/web1.VHD”
$VMname=”web1″
$NICName=”NIC1″
$PIPName=”PIP1″
$OSDisk=”web1″
Get-AzureRmVMSize $locationName | Out-GridView
$VMSize=”Standard_DS1_v2″
# Decide which VM size to use
Get-AzureRmVMSize $locationName | Out-GridView
$VMSize=”Standard_DS1_v2″
#Upload “VHD drive to Azure
Add-AzureRmVhd -ResourceGroupName $resourceGroupName -Destination $destinationVhd -LocalFilePath $myVHD
# Configure Azure Network
$virtualNetwork = Get-AzureRmVirtualNetwork -ResourceGroupName $resourceGroupName -Name $virtualNetworkName
$publicIp = New-AzureRmPublicIpAddress -Name $PIPName -ResourceGroupName $ResourceGroupName -Location $locationName -AllocationMethod Dynamic
$networkInterface = New-AzureRmNetworkInterface -ResourceGroupName $resourceGroupName -Name $NICName -Location $locationName -SubnetId $virtualNetwork.Subnets[0].Id -PublicIpAddressId $publicIp.Id
# Configure VM
$vmConfig = New-AzureRmVMConfig -VMName $VMname -VMSize $VMSize
$vmConfig = Set-AzureRmVMOSDisk -VM $vmConfig -Name $OSDisk -VhdUri $destinationVhd -CreateOption Attach -Windows
$vmConfig = Add-AzureRmVMNetworkInterface -VM $vmConfig -Id $networkInterface.Id
#Create VM
$vm = New-AzureRmVM -VM $vmConfig -Location $locationName -ResourceGroupName $resourceGroupName
Check running VM in Azure.
After finishing the last command, VM is created and started.
Login to https://portal.azure.com/
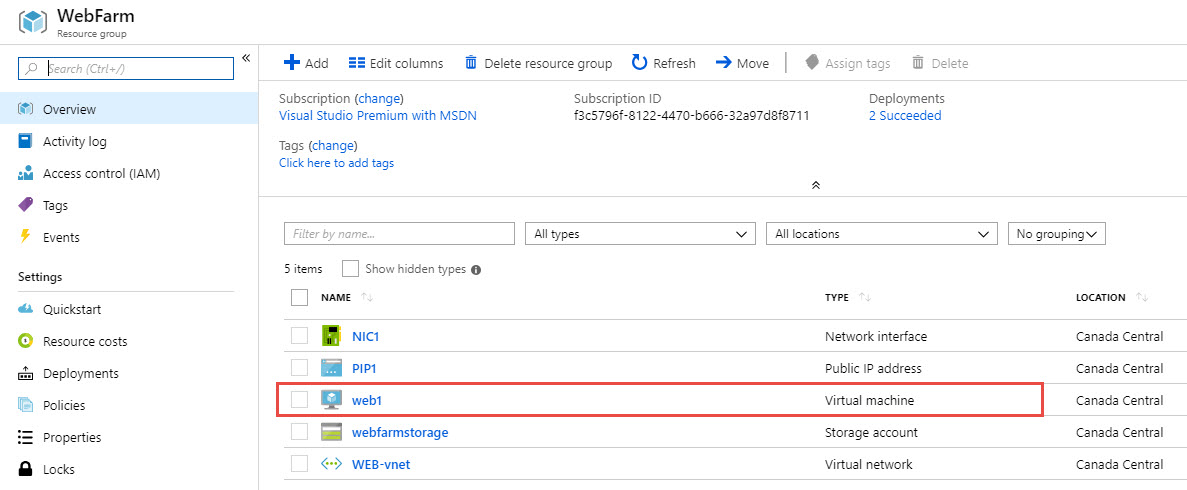
Navigate to your resource group. You will see newly created VM which is already running
Connect to VM
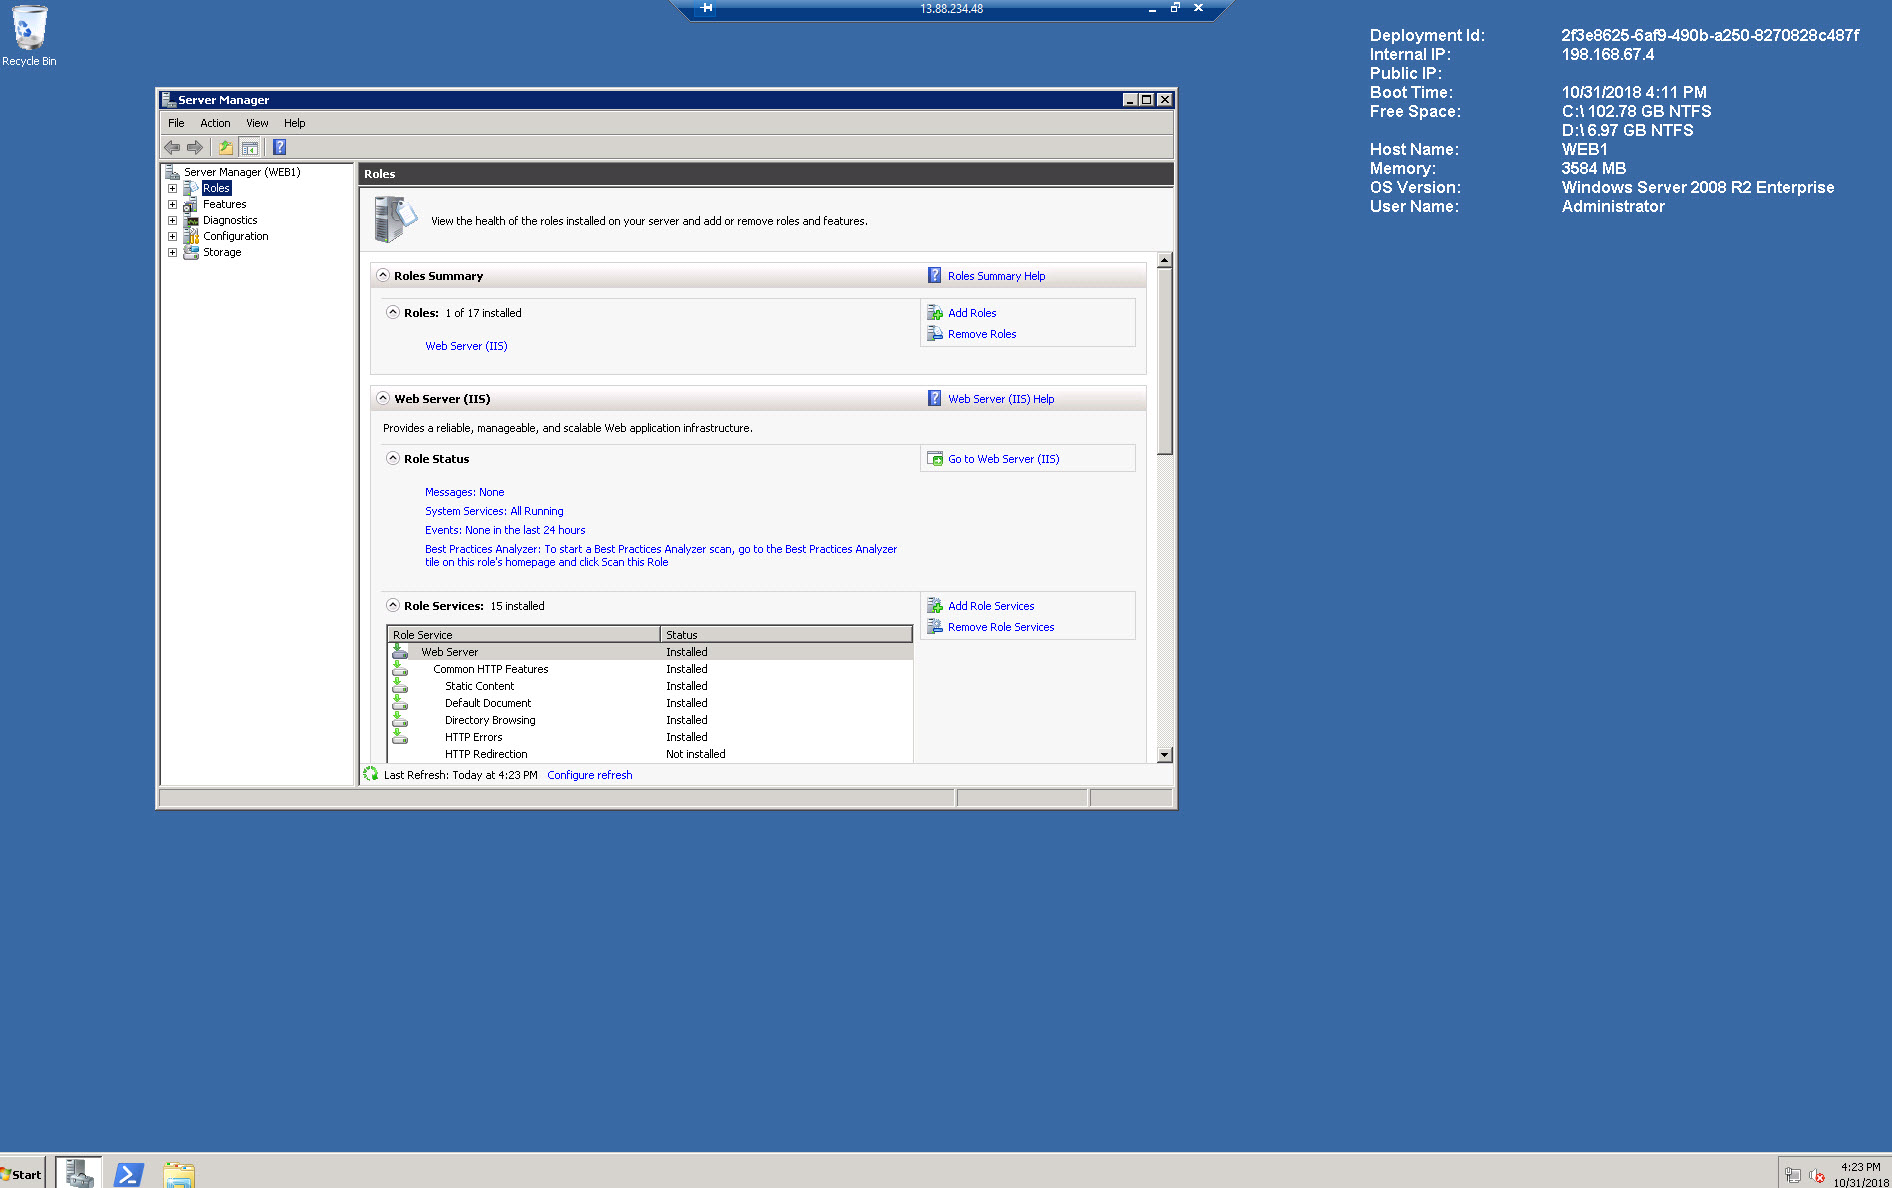
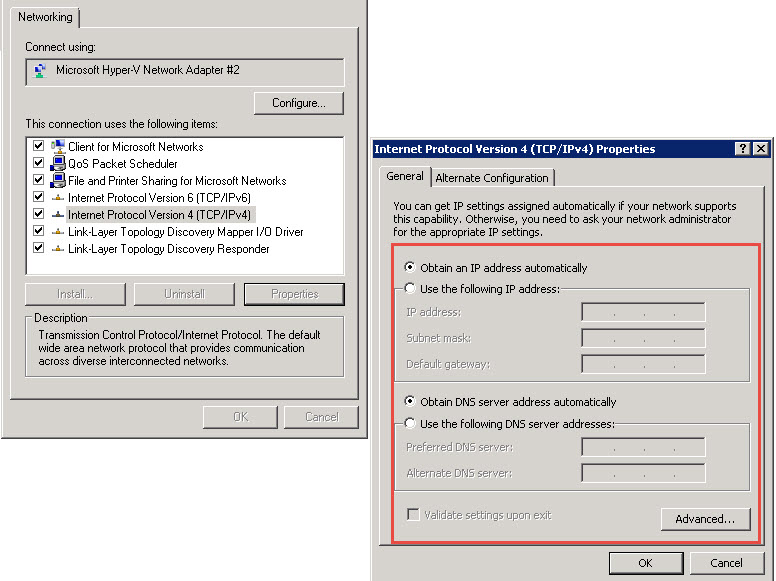
Also, Notice that Network Properties are reset during VM creation and DHCP is enabled on VM.
Change public DNS.
At this moment web1 VM is migrated and it is running in Azure
Now you will need to change Public DNS record for a website to point to Public IP of Azure VM.
The End
Good job Dan! Thanks for the step by step procedural! Process nicely explained.
ZM
Is this process applicable to WINDOWS SERVER 2003 R2 STD X64 SERVICE PACK 2 ?
YOu can probably convert server to file but azure will not support windows 2003.
Thank you Dan. This is very clear and reusable.