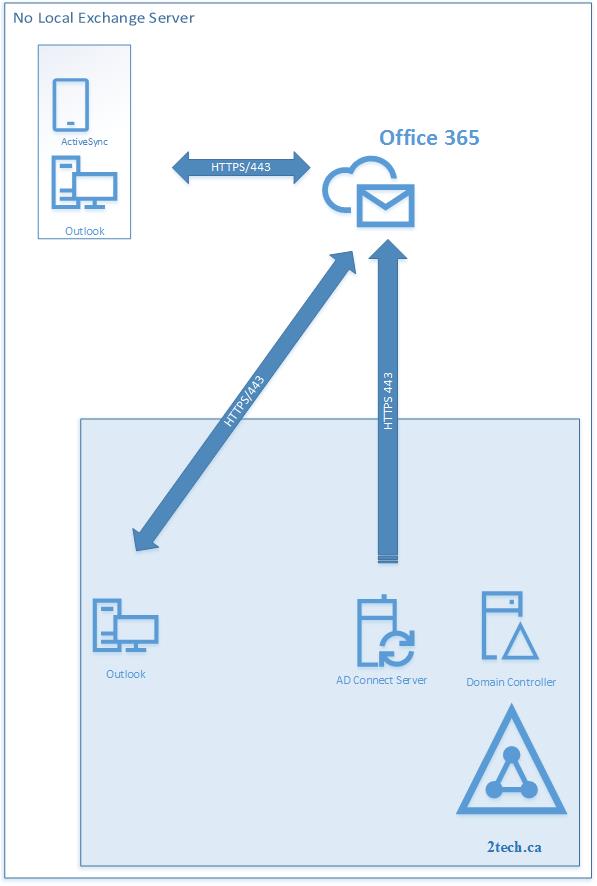
In this scenario presented here, we need to transfer the source of authority for a user account when that account was originally created by using Office 365 management tools. We need to transfer the source of authority so that the account can be managed through an on-premises Active Directory Domain Services user account by using directory synchronization provide by AD Connect.
Current Settings
Initially, we have configured:
- Office 365 accounts/mailboxes already provisioned in Office 365/Exchange Online.
- Users ID and password are setup in Office 365.
- Local Active Directory has all account objects.
- There is no AD Connect Server locally installed and there is no sync from On-premises to Office 365.
- There is no Exchange Server locally Installed.
We need to:
- Link Office 365 accounts back to On-premises Active Directory accounts.
- The password needs to be sync from On-premises Active Directory to Office 365.
- All mailbox properties need to be managed locally and propagated to Office 365 using AD Connect.
Those two conditions had to be meet first in our example.
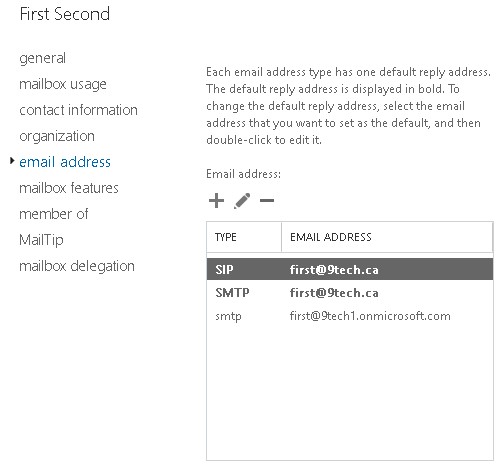
- The local AD account and UPN was set to first@9tech.ca
- Exchange Online Primary SMTP (first@9tech.ca) is matching local UPN (first@9tech.ca)
Here is the view from Office 365. Account “First” is “In Cloud” account as you can see from the figure.
![]()
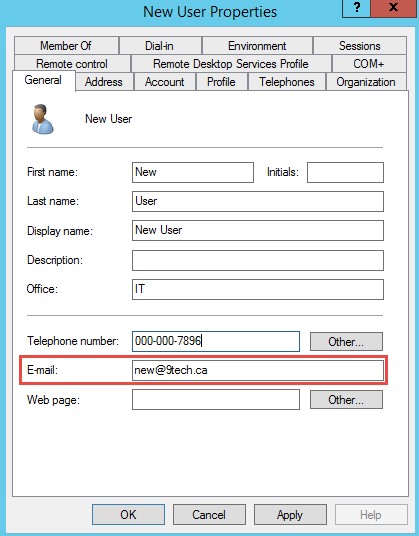
Use Active Directory User and Tools and make sure that Email field in AD properties of account is populated with Primary SMTP address.
Install AD Connect and run a sync
At this step, we are installing AD Connect and enabling OU filtering to OU where our test account is located.
After AD Connect sync to Office 365, account (first@9tech.ca) is converted from “In-Cloud” to “Sync with On-premises Active Directory” as you can see from the following picture.
![]()
The source of authority for directory sync has been moved from Azure AD to the local On-premises Active Directory.
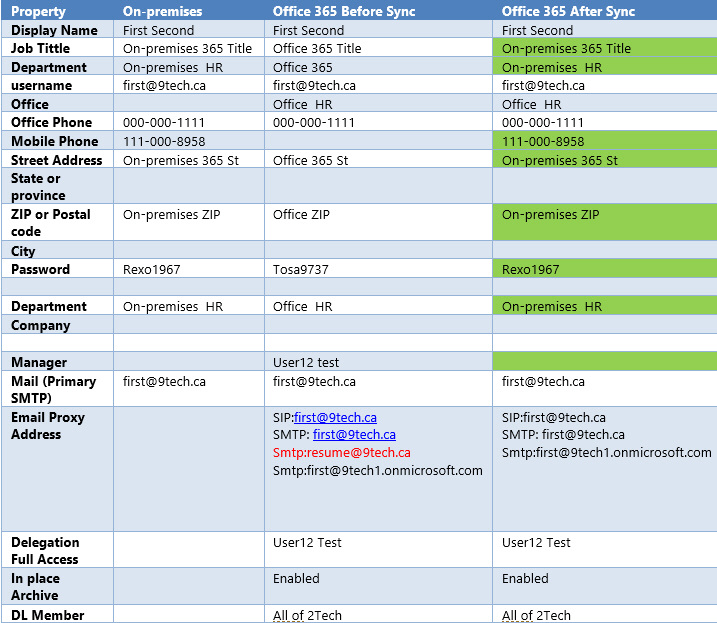
The following table shows how attributes of objects changes in Office 365 after the sync.
Fields in green color were changed in Office 365 after the sync.
The following table show syncing behavior for attributes which are synced from On-premises to Office 365
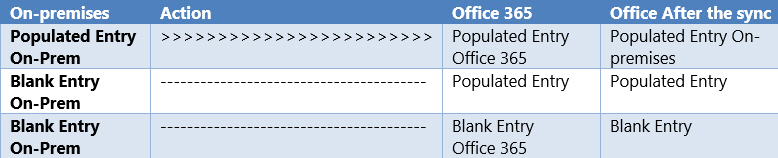
After we populate all necessary fields, AD Connect will propagate those attribute properties to Azure AD/Exchange Online.
We can manually copy all basic attributes (title, phone, street etc.) from Azure AD/Exchange Online and to Local Active Directory using Active Directory User and Tools.
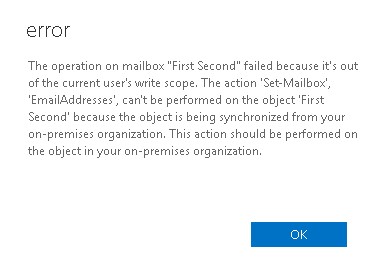
How to fix additional Exchange Online proxy email address?
It is more difficult with an additional email address because Active Directory User and Tools has no field for the proxy address attribute.
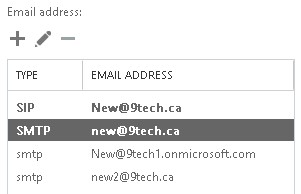
After the initial sync, additional proxy email addresses were deleted from Office 365.
We can try to add missing resume@9tech.ca email address back to mailbox in Exchange Online
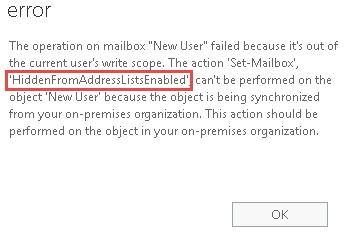
But when we press save, we are presented with an error which notifies us that we should change properties on On-premises objects in AD instead in Office 365.
We can use native AD PowerShell commands to check attributes of objects in local AD.
Get -ADUser -identity first -properties * | fl DisplayName,mail,ProxyAddresses

We can add resume@9tech.ca to local AD account using the following PowerShell command
Set-ADUser -identity first -Add @{Proxyaddresses=”SMTP:first@9tech.ca”,”smtp:resume@9tech.ca”}
![]()
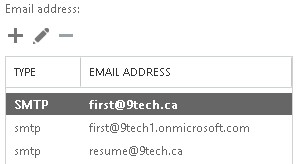
After we sync local Active Directory to Azure AD new proxy email address is added to Exchange Online Mailbox,
After this step existing user is fully functional in Office 365, all attributes are copied from local AD to Office 365 and local Active Directory passwords are propagated to Office 365.
Provision new Mailboxes in Office 365
The following paragraph is showing a process to how to provision mailbox to Office 365 using on-premises Active Directory.
- Creating the User
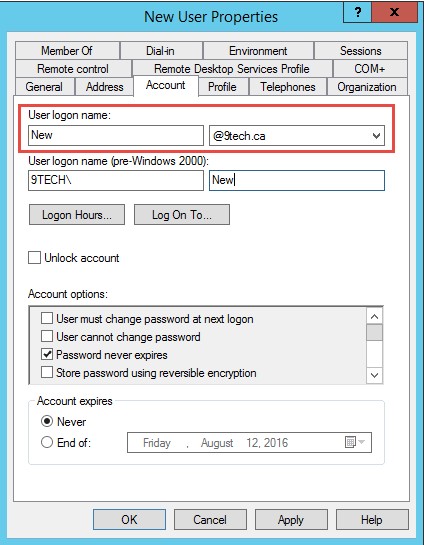
- Open Active Directory Users and Computers on Local AD
- Create an Active Directory user as you normally would.
- Ensure that the user’s email address on the General tab of the AD properties is correct.
- Ensure that the user’s UPN name match their primary SMTP address.
- Run the following command to add any additional SMTP address to mailbox
Set-ADUser -identity new -Add @{Proxyaddresses=”SMTP:new@9tech.ca”,”smtp:new2@9tech.ca”} - Run AD Connect Sync
- Login to Office 365 and configure users location and assign license
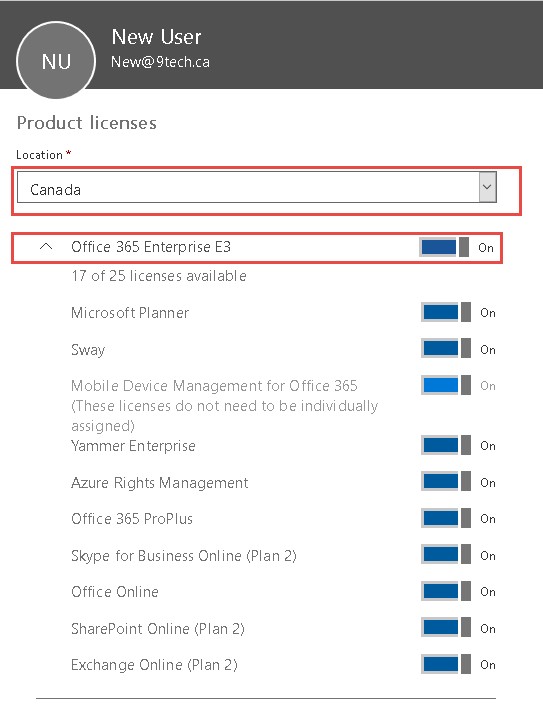
- Check if additional email address are assigned correctly
There are some of settings and features which we are not able to configure without installing local exchange server.
Those are some of the examples which you will not be able to setup.
- Hide mailbox in GAL
- Provision Archive mailbox in Exchange Online for users which are synced from On-premises.
- Create shared or room mailbox which is sync from On-premises.
If you try to hide mailbox in Office 365 or newly created mailbox, an error will occur and we will be notified that operation needs to be performed in local AD instead in Exchange Online.
This article explained how to change source authority from Office 365 identities to local Active Directory.
Is this method of provisioning and managing identities supported by Microsoft?
The following TechNet article describes what supported tools are:
How and when to decommission your on-premises Exchange servers in a hybrid deployment
“The Exchange Management Console, the Exchange Administration Center (EAC), and the Exchange Management Shell are the only supported tools that are available to manage Exchange recipients and objects.”
We need to have Exchange on-premises.
The next article is outlining a scenario in which local on-prem exchange servers is presented.
See the other blog for more details.
https://blogs.msdn.microsoft.com/vilath/2015/05/25/office-365-and-dirsync-why-should-you-have-at-least-one-exchange-server-on-premises/
What happens when you add only one entry to the proxyaddresses?
Instead:
Set-ADUser -identity new -Add @{Proxyaddresses=”SMTP:new@9tech.ca”,”smtp:new2@9tech.ca”}
Only:
Set-ADUser -identity new -Add @{Proxyaddresses=”smtp:new2@9tech.ca”}
Would this also work or does it make no sense?
Regards
Alitai
You can add one entry but that entry must have capital SMTP for part of email address.
One email address must have capital SMTP (primary SMTP address)
Here is a example.
Set-ADUser -identity new -Add @{Proxyaddresses=”SMTP:new2@9tech.ca”}
Hello Mr. Djurasovic
Now i understand why it needs both.
It makes sense for me now.
Thank you so much for the Answer!
Best Regards
Alitai
If you’ve never had on-prem exchange you can “Hide Users from the GAL” by using a custom sync rule in Azure AD Connect as describe in the following article.
http://jackstromberg.com/2018/08/how-to-hide-users-from-the-gal-in-office-365-synchronized-from-on-premises/
Hi Dan,
I read your article and its good. i have a question, its synchronization issues between our on perm AD and Azure AD after installing AD connect.
The issue we have is each time I add an email account to the special group we created for DLP in the on perm AD, when it synchronizes it changes the email user name
example: we have “ John Smith” on our domain controller AD email address is smith@corp.com, then after synchronization the email changes to smithj@corp.com on the Azure AD which automatically disconnects the user.
how do I fix this issue?
thank you
I am not aware that AD Connect can change attributes on the user.
You might have local Exchange Email Policy which is changing that SMTP attribute.